SpringApplication.run()을 하면 어떤일이 일어날까?
서론
Spring Application의 run()이 호출될 때 내부에서 어떤 일이 일어나는지, 사실 그동안 깊이 생각해본 적이 없었던 것 같다. 최근 Spring Security를 세세하게 들여다보면서 정교하게 설계된 Spring 생태계에 대한 관심이 많이 생겼고, 시간이 날 때 실제로 애플리케이션이 어떤 방식으로 실행되는지 직접 따라가 보고 싶어졌다.
Spring Authorization Server를 공부하면서 Spring 프레임워크의 교체 용이성에 감탄하는 순간이 여러 번 있었다.
예를 들어 /oauth2/authorize 인가 요청이 들어오면, 프레임워크는 Web Filter 체인을 타고 들어와 Converter에서 요청의 타입과 인스턴스를 검증한 뒤,
Provider가 인증 처리에 필요한 AuthenticationToken을 반환하는 흐름으로 동작한다.
만약 추가 파라미터를 받아야 하거나 인증 과정에서 별도의 처리가 필요하다면,
Provider를 직접 커스텀해서 교체하거나 Customizer를 통해 Provider를 추가하는 것만으로 원하는 동작을 끼워 넣을 수 있다.
이 부분은 추후에 글로 자세히 남겨보려고 한다.
Security의 인증/인가 처리 시에 프레임워크 레벨에서 각기 어느 지점을 타고 동작하는지는 대략적으로 알아보며, Spring Boot App은 항상 사용하고 있지만, 어떤 방식으로 동작하는지, 어떤 과정을 거쳐 앱이 구동되는지 궁금해졌다.
이런 내용을 전부 다 외울 필요는 없겠지만 어떤 순서로 어느 시점에 내가 설정한 내용들이 bean이 만들어지는지 알아보자.
run() 실행 시
요약하면 SpringApplication.run()을 호출하면 다음과 같은 순서로 앱이 구동된다고 한다.
1 ~ 3. 준비 단계
- CRaC 환경 여부 판단
- BootstrapContext 초기화 (외부 설정 서버 연동 등)
- Headless 모드 세팅
4. RunListener
SpringApplicationRunListener구현체들에게 시작 이벤트 전파- Spring Cloud 등 외부 라이브러리가 이 시점에 후킹
5 ~ 6. Environment
- args 파싱
application.yml, 환경변수, 시스템 프로퍼티 등 로드ApplicationEnvironmentPreparedEvent발행
7. Banner
- 콘솔에 Spring 배너 출력
- 커스텀
banner.txt적용 시점
8. ApplicationContext 생성
- 웹 타입에 따라 다른 컨텍스트 생성
Servlet  → AnnotationConfigServletWebServerApplicationContext
Reactive → AnnotationConfigReactiveWebServerApplicationContext
None     → AnnotationConfigApplicationContext
9. prepareContext
- BeanDefinition 로드 (
@SpringBootApplication스캔) ApplicationContextInitializer실행ApplicationPreparedEvent발행
10. refreshContext(핵심)
- Bean 생성 및 의존성 주입
- @Configuration 처리
- 내장 톰캣 시작 (웹 앱인 경우)
- @Scheduled, @Async 등 후처리
public ConfigurableApplicationContext run(String... args) {
// 1. CRaC 여부 판단
Startup startup = Startup.create();
startup.started();
// 2. Bootstrap 컨텍스트 초기화
DefaultBootstrapContext bootstrapContext = createBootstrapContext();
// 3. 변수 선언 + Headless 세팅
ConfigurableApplicationContext context = null;
configureHeadlessProperty();
// 4. RunListener 준비 및 starting 이벤트 발행
SpringApplicationRunListeners listeners = getRunListeners(args);
listeners.starting(bootstrapContext, this.mainApplicationClass);
try {
// 5. ApplicationArguments 파싱
ApplicationArguments applicationArguments = new DefaultApplicationArguments(args);
// 6. Environment 준비 (application.yml 로드 등)
ConfigurableEnvironment environment = prepareEnvironment(listeners, bootstrapContext, applicationArguments);
// 7. Banner 출력
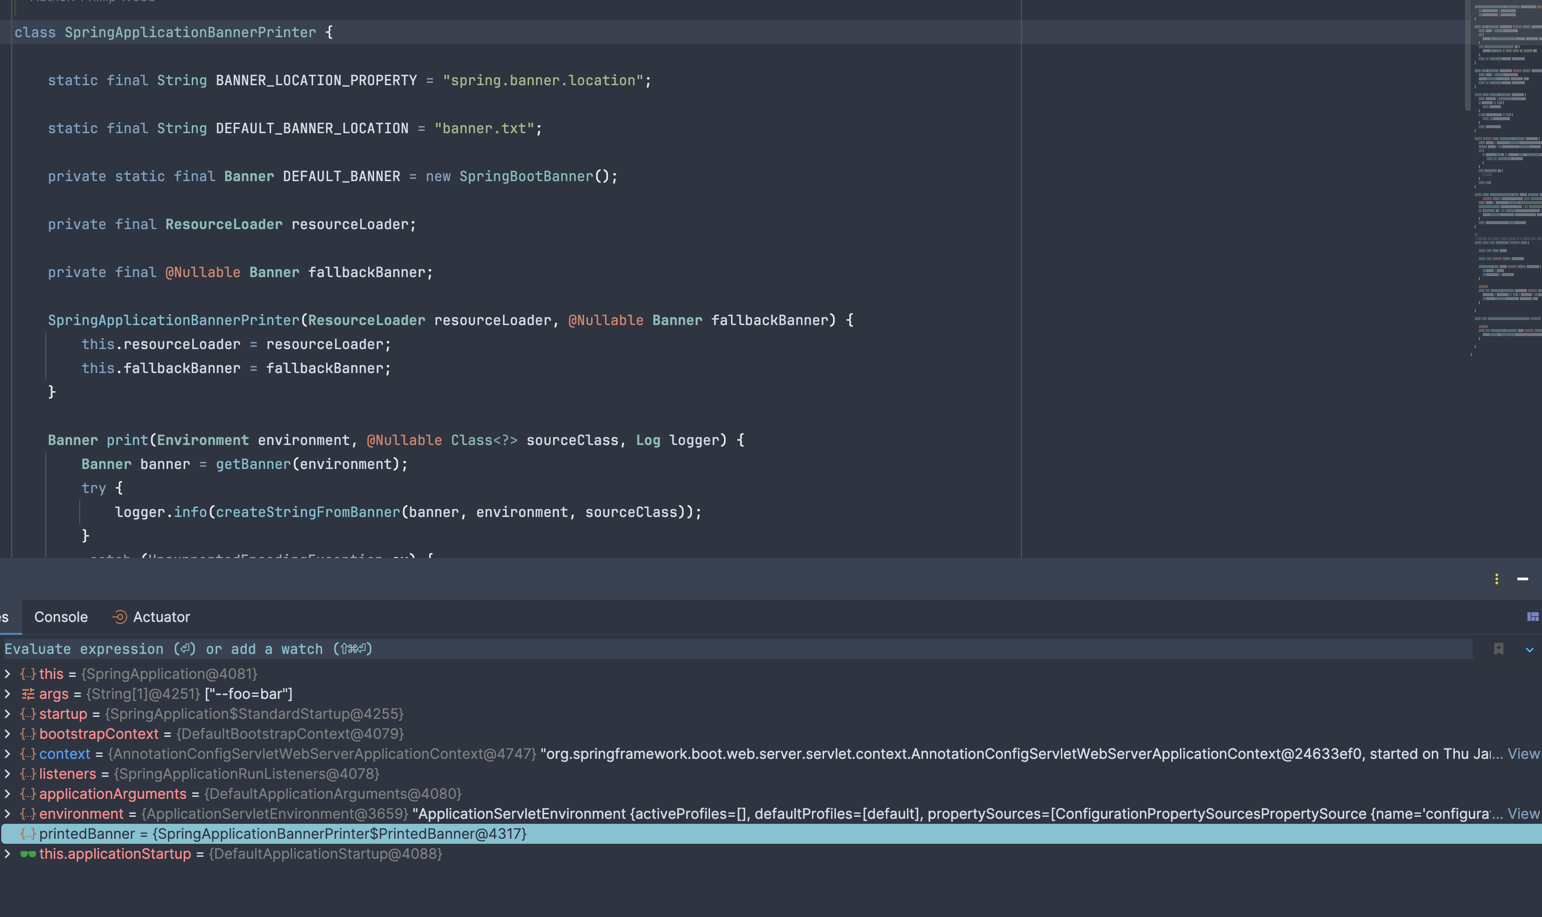
Banner printedBanner = printBanner(environment);
// 8. ApplicationContext 생성 (아직 refresh 전)
context = createApplicationContext();
// 9. ApplicationContext 준비 (Bean 정의 로드)
prepareContext(bootstrapContext, context, environment, listeners, applicationArguments, printedBanner);
// 10. ApplicationContext refresh (Bean 초기화 핵심 단계)
refreshContext(context);
// 11. refresh 후처리
afterRefresh(context, applicationArguments);
// 12. 구동 완료
startup.ready();
// 13. started 이벤트 발행
listeners.started(context, startup.timeTakenToStarted());
// 14. ApplicationRunner / CommandLineRunner 실행
callRunners(context, applicationArguments);
} catch (Throwable ex) {
handleRunFailure(context, ex, listeners);
throw new IllegalStateException(ex);
}
// 15. ready 이벤트 발행
listeners.ready(context, startup.ready());
return context;
}
1. StartUp.create()
static Startup create() {
    ClassLoader classLoader = Startup.class.getClassLoader();
    // JDK 레벨 crac 지원 확인
    return (ClassUtils.isPresent("jdk.crac.management.CRaCMXBean", classLoader)
            // 라이브러리 레벨 crac 지원 확인
            && ClassUtils.isPresent("org.crac.management.CRaCMXBean", classLoader))
            ? new CoordinatedRestoreAtCheckpointStartup() : new StandardStartup();
}
CRaC가 뭔가?
CRaC (Coordinated Restore at Checkpoint)
JVM을 특정 시점에 스냅샷(checkpoint) 으로 저장했다가 나중에 그 상태 그대로 복원(restore) 하는 기술로 JVM 콜드 스타트 시간 단축한다.
일반적인 JVM 시작:  [JVM 초기화] → [앱 초기화] → [Ready]  (수 초)

CRaC 복원 시작:      [스냅샷 로드] → [Ready]            (수십 ms)
일반적으로는 StardardStartup()으로 수행된다.
2. DefaultBootstrapContext bootstrapContext = createBootstrapContext();
private DefaultBootstrapContext createBootstrapContext() {
    // 빈 BootstrapContext 생성
    DefaultBootstrapContext bootstrapContext = new DefaultBootstrapContext();

    // initializer 순회하며 bootstrapContext 등록
    this.bootstrapRegistryInitializers.forEach((initializer) -> initializer.initialize(bootstrapContext));
    return bootstrapContext;
}
BootstrapContext가 뭔가?
A simple bootstrap context that is available during startup and Environment post-processing up to the point that the ApplicationContext is prepared
실제 ApplicationContext가 준비되기 전에 startup 시에 만드는 임시 컨테이너이다.
- 외부 설정 로드 (ex. AWS Secrets Manager, Vault)
- 암호화 키 초기화
- 본 컨텍스트 생성 전에 필요한 리소스 준비
@SpringBootApplication
public class SpringDojoApplication {
public static void main(String[] args) {
SpringApplication app = new SpringApplication(SpringDojoApplication.class);
// App의 bootstrap registry에 추가하여 initialize를 익명함수로 작성하면 boot strap 컨테이너가 동작하는 것을 확인할 수 있다.
app.addBootstrapRegistryInitializer(new BootstrapRegistryInitializer() {
@Override
public void initialize(BootstrapRegistry registry) {
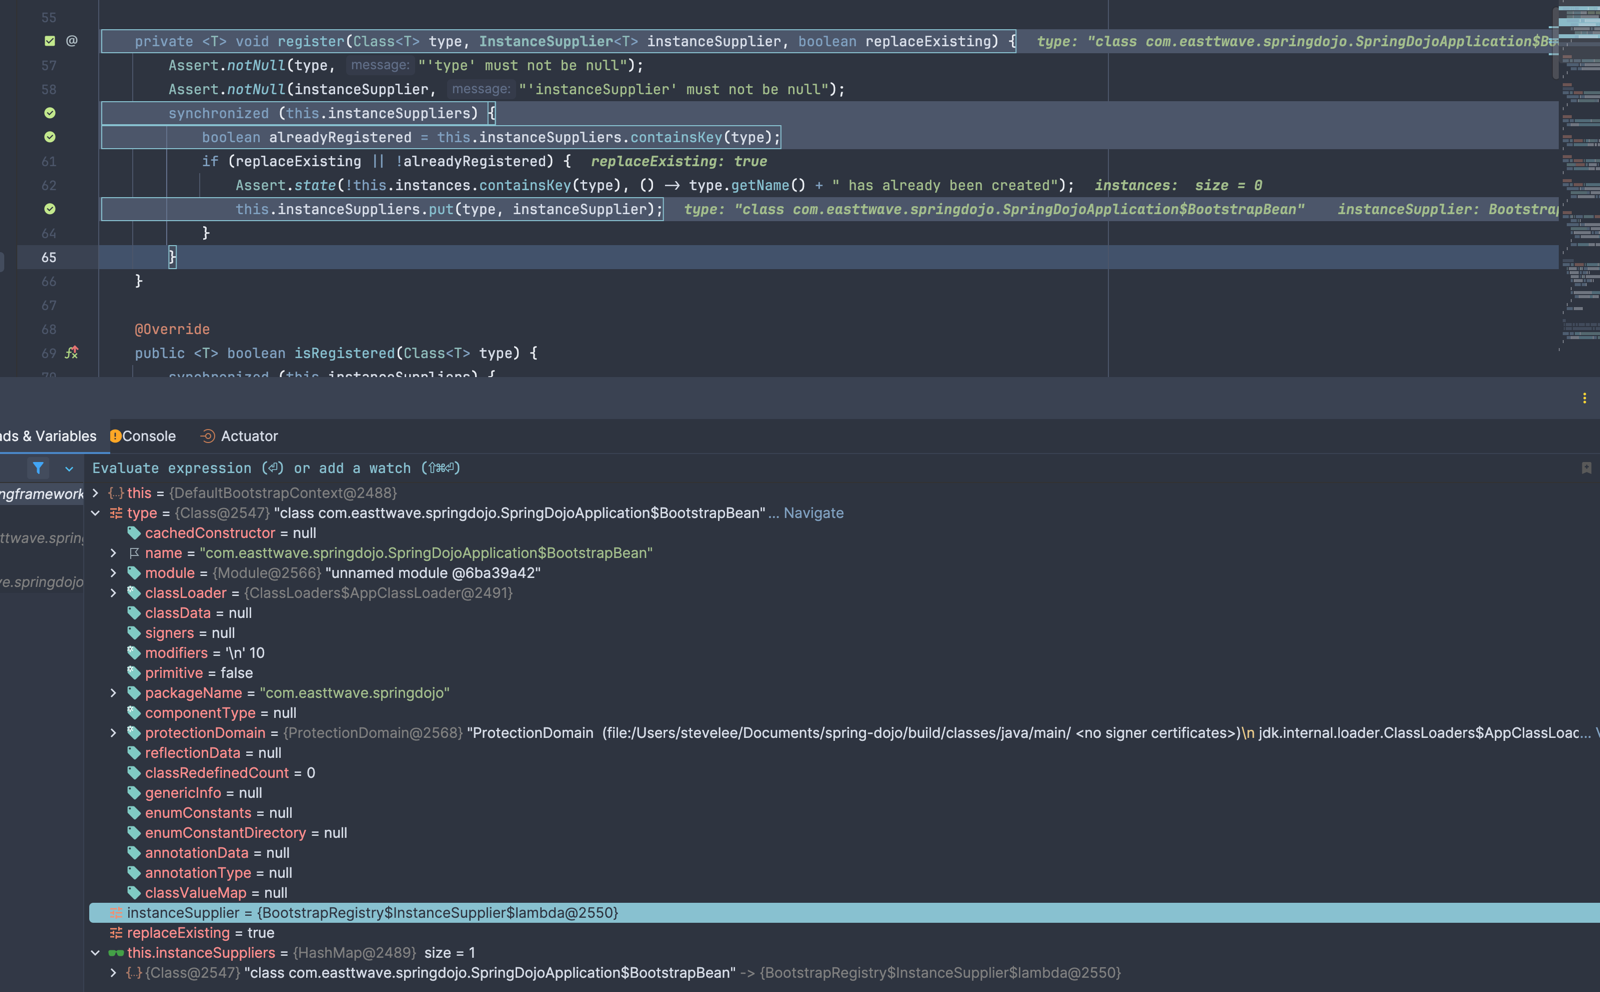
registry.register(BootstrapBean.class, BootstrapRegistry.InstanceSupplier.of(new BootstrapBean()));
}
});
app.run(args);
}
private static class BootstrapBean {
protected BootstrapBean() {
System.out.println("BootstrapBean.class constructor");
}
}
}
디버거로 확인하면 null이던 것이 값이 들어오는것으로 확인할 수 있다.
3. configureHeadlessProperty()
// instance 변수
private boolean headless = true;

private void configureHeadlessProperty() {
    // 시스템 정보에서 Awt Headless를 로드한다.
    System.setProperty(SYSTEM_PROPERTY_JAVA_AWT_HEADLESS,
            System.getProperty(SYSTEM_PROPERTY_JAVA_AWT_HEADLESS,
                    Boolean.toString(this.headless)));
}
원래 Java AWT는 모니터/키보드/마우스 같은 디스플레이 장치가 있다고 가정한다고 한다. 서버 환경엔 당연히 없기 때문에 디스플레이 장치가 없는것을 JVM에 명시한다.(Headless = true)
4. getRunListenter(args)
SpringApplicationRunListeners listeners = getRunListeners(args);
listeners.

starting(bootstrapContext, this.mainApplicationClass);
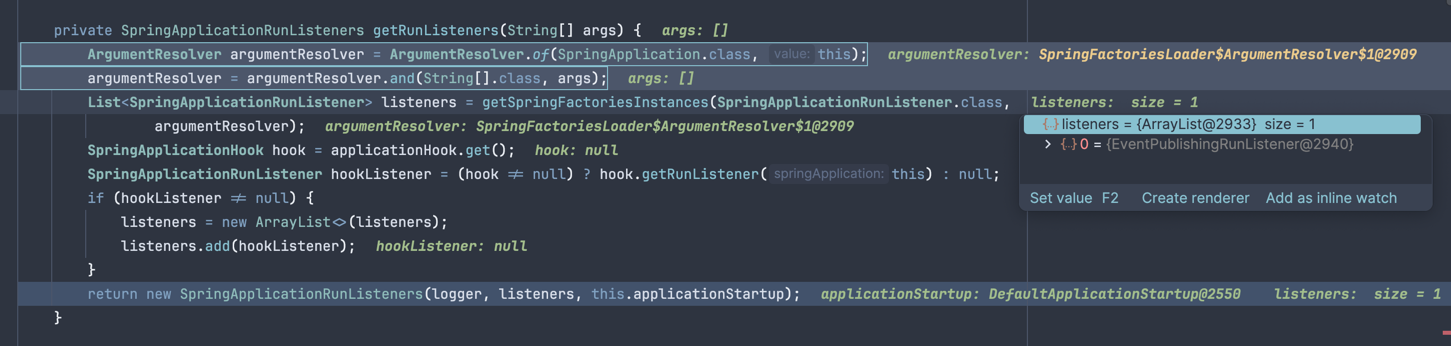
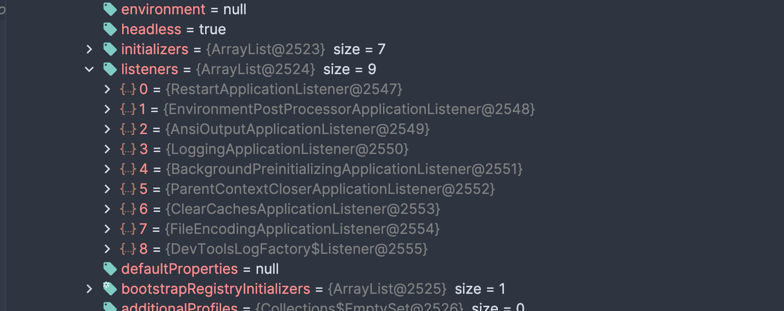
default로 boot app을 구동했을때 debugger로 출력해보면 다음과 같은 listener만 등록되는것을 확인할 수 있다.
해당 SpringApplicationRunListener는 package org.springframework.boot.context.event 내에 포함되어 있고,
아래와 같은 동작을 수행한다.
Called once the environment has been prepared, but before the {@link ApplicationContext} has been created.
복잡하긴 하지만 천천히 코드 내부를 뜯어보면,
public class EventPublishingRunListener implements SpringApplicationRunListener {

    @Override
    public void environmentPrepared(...) {
        // ApplicationEvent로 변환해서 발행
        multicastEvent(new ApplicationEnvironmentPreparedEvent(...));
    }

    @Override
    public void contextLoaded(...) {
        multicastEvent(new ApplicationPreparedEvent(...));
    }
}
run()이 수행되는 동안 각 단계별로 수행할때 외부로 listener broadcast를 진행한다.
Application Listener의 경우 log(slf4j), environment 후처리기.. 등이 있다고 한다.
직접 디버거로 확인해봤을 때는 9개의 listener가 되는 것을 확인할 수 있다.(refreshContext 이후 추가 됨) claude로 확인해보니 prepareContext() 단계에 listener로
등록된다고 한다.
mainApplicationClass 에 기본 설정된 listener이다.
5. new DefaultApplicationArguments(args)
Default implementation of ApplicationArguments.
DefaultApplicationArguments는 ApplicationArgument이며 ApplicationArguemnt는 SpringApplication에서 넘겨받는 args에 접근을 제공한다. (쉽게 말해 Spring Application 구동에 활용되는 args에 접근하기 위해 사용됨)
Provides access to the arguments that were used to run a SpringApplication.
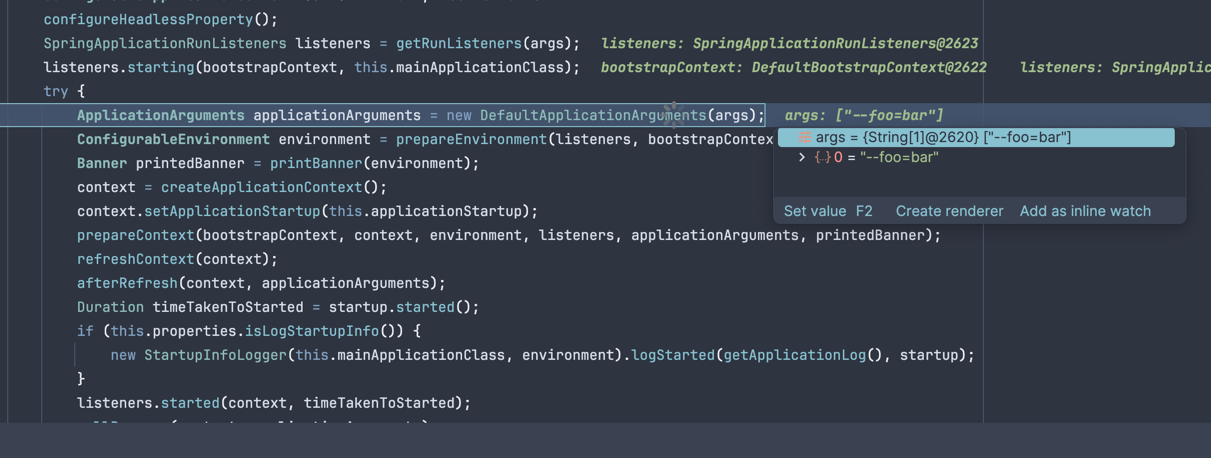
program arguments로 --foo=bar를 넘기게 됐을때 디버거에는 아래와 같이 찍히는 모습을 확인할 수 있다.
6. prepareEnvironment(...)
private ConfigurableEnvironment prepareEnvironment(SpringApplicationRunListeners listeners,
                                                   DefaultBootstrapContext bootstrapContext, ApplicationArguments applicationArguments) {
    // 1. Environment 생성
    ConfigurableEnvironment environment = getOrCreateEnvironment();

    // 2. 기본 설정 적용
    configureEnvironment(environment, applicationArguments.getSourceArgs());

    // 3. ConfigurationPropertySources 연결
    ConfigurationPropertySources.attach(environment);

    // 4. environmentPrepared 이벤트 발행
    listeners.environmentPrepared(bootstrapContext, environment);

    // 5. 특정 PropertySource들 순서 조정
    ApplicationInfoPropertySource.moveToEnd(environment);
    DefaultPropertiesPropertySource.moveToEnd(environment);

    // 6. 유효성 검사
    Assert.state(!environment.containsProperty("spring.main.environment-prefix"), ...);

    // 7. Environment → SpringApplication 바인딩
    bindToSpringApplication(environment);

    // 8. Environment 타입 변환 (필요 시)
    if (!this.isCustomEnvironment) {
        environment = environmentConverter.convertEnvironmentIfNecessary(...);
    }

    // 9. ConfigurationPropertySources 재연결
    ConfigurationPropertySources.attach(environment);

    return environment;
}
config 우선순위
공식문서 externalize configuration 우선순위를 확인할 수
있다.
우선순위
- 기본 프로퍼티 — SpringApplication.setDefaultProperties(Map)으로 직접 지정한 값
- @PropertySource — @Configuration 클래스에 선언한 어노테이션. 단, ApplicationContext refresh 시점에 로드되기 때문에 logging., spring.main. 같이 refresh 전에 읽히는 값에는 적용 안 됨
- Config 데이터 — application.properties, application.yml 같은 설정 파일
- RandomValuePropertySource — random.* 형태의 프로퍼티만 가짐 (ex. ${random.uuid})
- OS 환경변수 — SERVER_PORT 같은 시스템 환경변수
- Java 시스템 프로퍼티 — System.getProperties(), -Dserver.port=8080 같은 JVM 옵션
- JNDI 속성 — java:comp/env 로부터 가져오는 값
- ServletContext 초기화 파라미터
- ServletConfig 초기화 파라미터
- SPRING_APPLICATION_JSON — 환경변수나 시스템 프로퍼티에 인라인 JSON으로 넣은 값
- 커맨드라인 인수 — --server.port=9090 같은 값
- 테스트의 properties 속성 — @SpringBootTest 및 슬라이스 테스트 어노테이션에서 지정한 값
- @DynamicPropertySource — 테스트에서 동적으로 등록하는 프로퍼티
- @TestPropertySource — 테스트에서 정적으로 지정한 프로퍼티 파일
- Devtools 글로벌 설정 — devtools 활성화 시 $HOME/.config/spring-boot 디렉토리의 설정값
7. PrintBanner()
private @Nullable Banner printBanner(ConfigurableEnvironment environment) {
    // Banner Mode 확인
    if (this.properties.getBannerMode(environment) == Banner.Mode.OFF) {
        return null;
    }
    // resource loader 선택
    ResourceLoader resourceLoader = (this.resourceLoader != null) ? this.resourceLoader
            : new DefaultResourceLoader(null);

    //
    SpringApplicationBannerPrinter bannerPrinter = new SpringApplicationBannerPrinter(resourceLoader, this.banner);
    if (this.properties.getBannerMode(environment) == Mode.LOG) {
        return bannerPrinter.print(environment, this.mainApplicationClass, logger);
    }
    return bannerPrinter.print(environment, this.mainApplicationClass, System.out);
}
디버거로 확인하면 기본적으로 spring application banner를 사용하는것을 확인할 수 있다.
만약 banner를 끄고 싶다면 yaml로는 아래와 같이 할 수 있고
spring:
  main:
    banner-mode: off  # 이때 null 반환
코드로는
SpringApplication app = new SpringApplication(MyApp.class);
app.

setBannerMode(Banner.Mode.OFF);
커스텀을 하고싶다면 /resource 하위에 banner.txt를 생성하면 된다. banner 생성기 를 활용하여 custom 할 수 있다.
8. context = createApplicationContext()
Strategy method used to create the ApplicationContext. By default this method will respect any explicitly set application context class or factory before falling back to a suitable default. return the application context (not yet refreshed)
Application Context를 생성하기 위한 전략 메서드로 사용된다. ApplicationContextFactory가 webApplicationType에 따라 적절한 ApplicationContext 구현체를 생성한다.
protected ConfigurableApplicationContext createApplicationContext() {
    // applicationType에 따라 context를 생성한다.
    ConfigurableApplicationContext context = this.applicationContextFactory
            .create(this.properties.getWebApplicationType());
    Assert.state(context != null, "ApplicationContextFactory created null context");
    return context;
}
| webApplicationType | 생성되는 구현체 |
|---|---|
| SERVLET | AnnotationConfigServletWebServerApplicationContext |
| REACTIVE | AnnotationConfigReactiveWebServerApplicationContext |
| NONE | AnnotationConfigApplicationContext |
WebApplicationType에 맞는 Context를 생성한다.
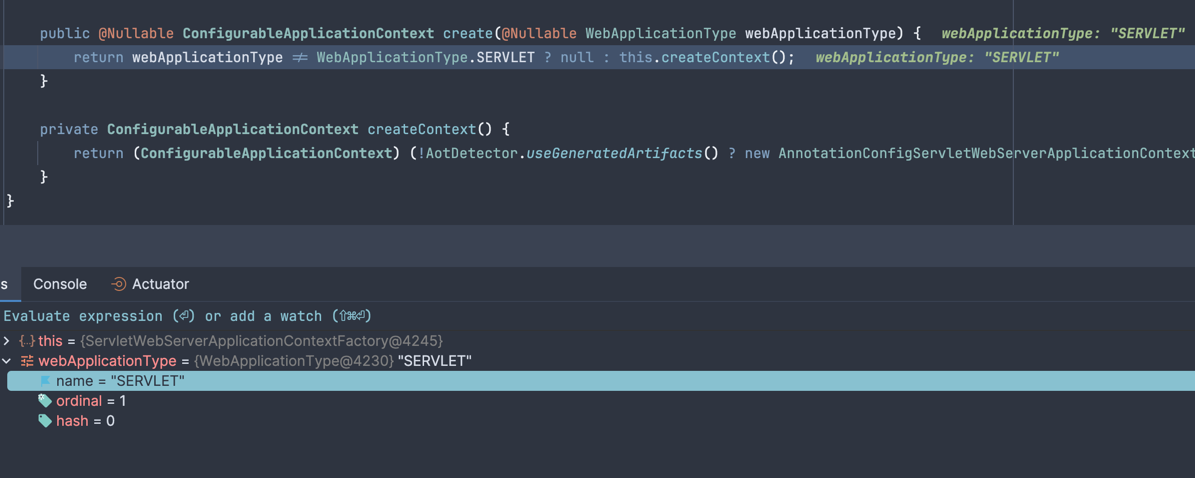
기본으로 Servlet 타입으로 생성되는것을 확인할 수 있다.
9. prepareContext(bootstrapContext, context, environment, listeners, applicationArguments, printedBanner)
private void prepareContext(DefaultBootstrapContext bootstrapContext,
                            ConfigurableApplicationContext context,
                            ConfigurableEnvironment environment,
                            SpringApplicationRunListeners listeners,
                            ApplicationArguments applicationArguments,
                            @Nullable Banner printedBanner) {

    // environment 연결
    context.setEnvironment(environment);
    // Context 후처리 (BeanNameGenerator, ResourceLoader, ConversionService 등)
    postProcessApplicationContext(context);
    // ApplicationContextInitializer 실행
    applyInitializers(context);
    // contextPrepared 이벤트 발행
    listeners.contextPrepared(context);
    // bootstrap context 컨테이너 종료
    bootstrapContext.close(context);
    if (this.properties.isLogStartupInfo()) {
        logStartupInfo(context);
        logStartupProfileInfo(context);
    }
    // Add boot specific singleton beans
    ConfigurableListableBeanFactory beanFactory = context.getBeanFactory();
    beanFactory.registerSingleton("springApplicationArguments", applicationArguments);
    if (printedBanner != null) {
        beanFactory.registerSingleton("springBootBanner", printedBanner);
    }
    if (beanFactory instanceof AbstractAutowireCapableBeanFactory autowireCapableBeanFactory) {
        autowireCapableBeanFactory.setAllowCircularReferences(this.properties.isAllowCircularReferences());
        if (beanFactory instanceof DefaultListableBeanFactory listableBeanFactory) {
            listableBeanFactory.setAllowBeanDefinitionOverriding(this.properties.isAllowBeanDefinitionOverriding());
        }
    }
    if (this.properties.isLazyInitialization()) {
        context.addBeanFactoryPostProcessor(new LazyInitializationBeanFactoryPostProcessor());
    }
    if (this.properties.isKeepAlive()) {
        context.addApplicationListener(new KeepAlive());
    }
    context.addBeanFactoryPostProcessor(new PropertySourceOrderingBeanFactoryPostProcessor(context));
    if (!AotDetector.useGeneratedArtifacts()) {
        // Load the sources
        Set<Object> sources = getAllSources();
        Assert.state(!ObjectUtils.isEmpty(sources), "No sources defined");
        load(context, sources.toArray(new Object[0]));
    }
    listeners.contextLoaded(context);
}
bootstrapContext.close(context)의 경우 앞서 우리가 빠르게 bootstrap container를 통해 띄웠던 bean이나 listener를 이제 실제
application으로 옮겨서 실행하는 작업을 해야하기 때문에 bootstrapContext는 종료하게 된다.
ConfigurableListableBeanFactory beanFactory = context.getBeanFactory(); 를 통해 필요한 beanFactory 정보를 context로 부터 불러온다.
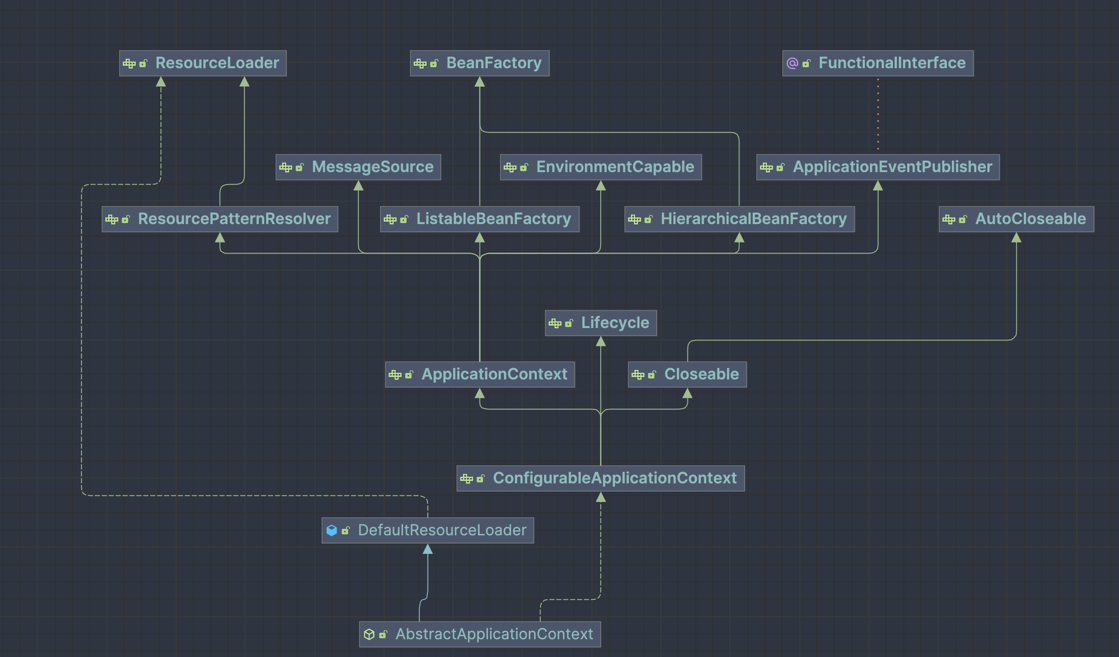
ConfigurableListableBeanFactory는 아래 ListableBeanFactory, AutowireCapableBeanFactory, ConfigurableBeanFactory를 상속하는
factory이며 더 상위는 BeanFactory이다.
public interface ConfigurableListableBeanFactory extends ListableBeanFactory, AutowireCapableBeanFactory, ConfigurableBeanFactory {
}
Configuration interface to be implemented by most listable bean factories. In addition to ConfigurableBeanFactory, it provides facilities to analyze and modify bean definitions, and to pre-instantiate singletons. This subinterface of org.springframework.beans.factory. BeanFactory is not meant to be used in normal application code: Stick to org. springframework. beans. factory. BeanFactory or ListableBeanFactory for typical use cases. This interface is just meant to allow for framework-internal plug'n'play even when needing access to bean factory configuration methods.
ConfigurableListableBeanFactory는 애플리케이션 코드 상 일반적인 사용을 위해서 제공되는것이 아니며 일반 사용이 목적이라면 ListableBeanFactory를 사용해야한다.
ConfigurableBeanFactory에 더해, 빈 정의를 분석·수정하고 싱글톤을 사전 인스턴스화(pre-instantiate)하는 기능을 추가로 제공한다.
이후 ConfigurableApplicationContext로부터 beanFactory를 꺼내어 아래 작업들을 수행한다.
- applicationArguments singleton bean 등록 (beanFactory.registerSingleton)
- printedBanner singleton bean 등록 (beanFactory.registerSingleton)
- LazyInitializationBeanFactoryPostProcessor 생성하여 등록 (context.addBeanFactoryPostProcessor) — lazyInitialization 설정이 활성화된 경우에만
- context.addApplicationListener(new KeepAlive()) — KeepAlive 객체를 등록
- PropertySourceOrderingBeanFactoryPostProcessor 생성하여 등록 (context.addBeanFactoryPostProcessor)
refreshContext(context)
private void refreshContext(ConfigurableApplicationContext context) {
    if (this.properties.isRegisterShutdownHook()) {
        shutdownHook.registerApplicationContext(context);
    }
    refresh(context);
}

public class ServletWebServerApplicationContext extends GenericWebApplicationContext implements ConfigurableWebServerApplicationContext {
    public final void refresh() throws BeansException, IllegalStateException {
        try {
            super.refresh();
        } catch (RuntimeException var5) {
            RuntimeException ex = var5;
            WebServer webServer = this.webServer;
            if (webServer != null) {
                try {
                    webServer.stop();
                    webServer.destroy();
                } catch (RuntimeException var4) {
                    RuntimeException stopOrDestroyEx = var4;
                    ex.addSuppressed(stopOrDestroyEx);
                }
            }

            throw ex;
        }
    }
}
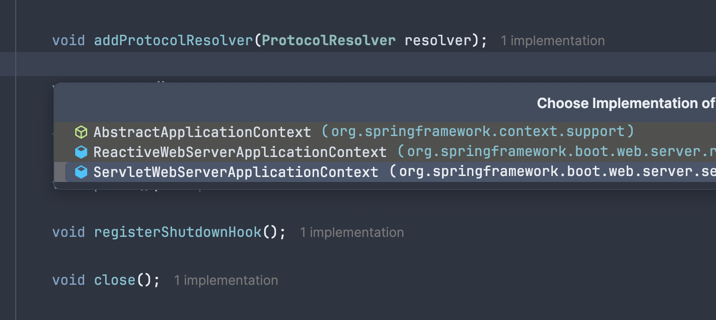
실제 super.refresh(); 호출을 거슬러 올라가보면 AbstractApplicationContext가 호출되는것을 알 수 있다.
public abstract class AbstractApplicationContext extends DefaultResourceLoader
        implements ConfigurableApplicationContext {

    static {
        // Eagerly load the ContextClosedEvent class to avoid weird classloader issues
        // on application shutdown in WebLogic 8.1. (Reported by Dustin Woods.)
        ContextClosedEvent.class.getName();
    }

    @Override
    public void refresh() throws BeansException, IllegalStateException {
        this.startupShutdownLock.lock();
        try {
            this.startupShutdownThread = Thread.currentThread();

            // refresh()를 실행 중인 스레드를 기록.
            // 이후 refresh 중복 실행 방지 및 shutdown 시 해당 스레드 인터럽트에 사용됨
            StartupStep contextRefresh = this.applicationStartup.start("spring.context.refresh");

            // refresh 전 사전 준비 작업:
            // - active/closed 플래그 초기화
            // - PropertySource 초기화 (initPropertySources)
            // - Environment의 required properties 검증
            // - earlyApplicationListeners 초기화
            prepareRefresh();

            // Tell the subclass to refresh the internal bean factory.
            // 내부 BeanFactory를 준비하는 단계.
            // SpringBoot 기준 GenericApplicationContext는 이미 생성된 DefaultListableBeanFactory를 반환.
            // XML 기반 컨텍스트라면 이 시점에 XML을 파싱하여 BeanDefinition을 등록함
            ConfigurableListableBeanFactory beanFactory = obtainFreshBeanFactory();

            // BeanFactory 자체에 대한 기본 설정을 적용하는 단계:
            // - ClassLoader 설정
            // - SpEL(Expression Language) 파서 등록
            // - PropertyEditorRegistrar 등록
            // - ApplicationContextAware 등록을 위한 BeanPostProcessor 추가
            // - BeanFactory, ApplicationContext 등 내부 의존성 타입을 autowiring 대상에서 제외
            // - environment, systemProperties 등 기본 singleton bean 등록
            prepareBeanFactory(beanFactory);

            try {
                // Allows post-processing of the bean factory in context subclasses.
                // 서브클래스에서 BeanFactory를 추가 커스터마이징할 수 있는 훅 메서드이다. 이 시점에 웹 관련 스코프(request, session)를 등록함
                postProcessBeanFactory(beanFactory);

                StartupStep beanPostProcess = this.applicationStartup.start("spring.context.beans.post-process");

                // Invoke factory processors registered as beans in the context.
                // BeanFactoryPostProcessor 및 BeanDefinitionRegistryPostProcessor 실행 단계.
                // 대표적으로 ConfigurationClassPostProcessor가 여기서 실행되어
                // @Configuration, @ComponentScan, @Bean 등을 처리하고 BeanDefinition을 등록함.
                // 즉, 이 시점에 대부분의 BeanDefinition 스캔/등록이 완료됨
                invokeBeanFactoryPostProcessors(beanFactory);

                // bean 생성을 가로채기 위해 사용되는 bean post processor 등록.
                // BeanPostProcessor는 bean 인스턴스 생성 전후에 개입하는 확장 포인트.
                // 대표적인 예:
                // - AutowiredAnnotationBeanPostProcessor (@Autowired, @Value 처리)
                // - CommonAnnotationBeanPostProcessor (@PostConstruct, @PreDestroy 처리)
                // 이 단계에서 등록만 하고, 실제 실행은 이후 bean 생성 시점에 이루어짐
                registerBeanPostProcessors(beanFactory);
                beanPostProcess.end();

                // message source 초기화.
                // MessageSource bean이 등록되어 있으면 해당 bean을 사용하고,
                // 없으면 기본 DelegatingMessageSource를 등록함.
                // 다국어(i18n) 메시지 처리를 담당함
                initMessageSource();

                // ApplicationEvent를 여러 ApplicationListener에게 멀티캐스트하는
                // ApplicationEventMulticaster를 초기화함.
                // 기본적으로 SimpleApplicationEventMulticaster가 등록됨
                initApplicationEventMulticaster();

                // 서브클래스 전용 특수 bean 초기화 훅 메서드.
                // 웹 환경에서는 이 시점에 EmbeddedWebServer(Tomcat 등)가 생성됨
                onRefresh();

                // Check for listener beans and register them.
                // BeanDefinition으로 등록된 ApplicationListener bean들을 찾아
                // ApplicationEventMulticaster에 등록함.
                // 또한 prepareRefresh()에서 보관해둔 earlyApplicationEvents를 이 시점에 발행함
                registerListeners();

                // lazy-init이 아닌 모든 singleton bean을 이 시점에 실제로 인스턴스화함.
                // @Autowired 주입, @PostConstruct 실행 등 bean 초기화 라이프사이클 전체가 여기서 진행됨.
                // 가장 무거운 단계
                finishBeanFactoryInitialization(beanFactory);

                // refresh 완료 후 마무리 작업:
                // - LifecycleProcessor 초기화 및 onRefresh() 호출
                // - ContextRefreshedEvent 발행
                // - 웹 환경이라면 WebServer 시작 및 ServerStartedEvent 발행
                finishRefresh();
            } catch (RuntimeException | Error ex) {
                // 불필요한 내용 중략

                // Destroy already created singletons to avoid dangling resources.
                destroyBeans();

                // active flag 활성화
                cancelRefresh(ex);

                // caller에게 예외 전파
                throw ex;
            } finally {
                contextRefresh.end();
            }
        } finally {
            this.startupShutdownThread = null;
            this.startupShutdownLock.unlock();
        }
    }
}
refreshContext의 경우 가장 중요한 메서드로 각 단계별로 내부 메서드를 확인해보려고 한다.
prepareRefresh()
private @Nullable Set<ApplicationListener<?>> earlyApplicationListeners;

protected void prepareRefresh() {
    // 활성 상태로 전환한다
    this.startupDate = System.currentTimeMillis();
    this.closed.set(false);
    this.active.set(true);

    // logger가 확성화 되어 있다면 trace나 debug 모드로 로깅 처리
    if (logger.isDebugEnabled()) {
        if (logger.isTraceEnabled()) {
            logger.trace("Refreshing " + this);
        } else {
            logger.debug("Refreshing " + getDisplayName());
        }
    }

    // 실제로는 아무것도 하지 않음
    initPropertySources();

    // environment의 필수 property를 validate
    getEnvironment().validateRequiredProperties();

    // early application listener를 초기화한다.
    if (this.earlyApplicationListeners == null) {
        this.earlyApplicationListeners = new LinkedHashSet<>(this.applicationListeners);
    } else {
        // Reset local application listeners to pre-refresh state.
        this.applicationListeners.clear();
        this.applicationListeners.addAll(this.earlyApplicationListeners);
    }

    // 초기화 - 인스턴스 변수 earlyApplicationEvents
    this.earlyApplicationEvents = new LinkedHashSet<>();
}
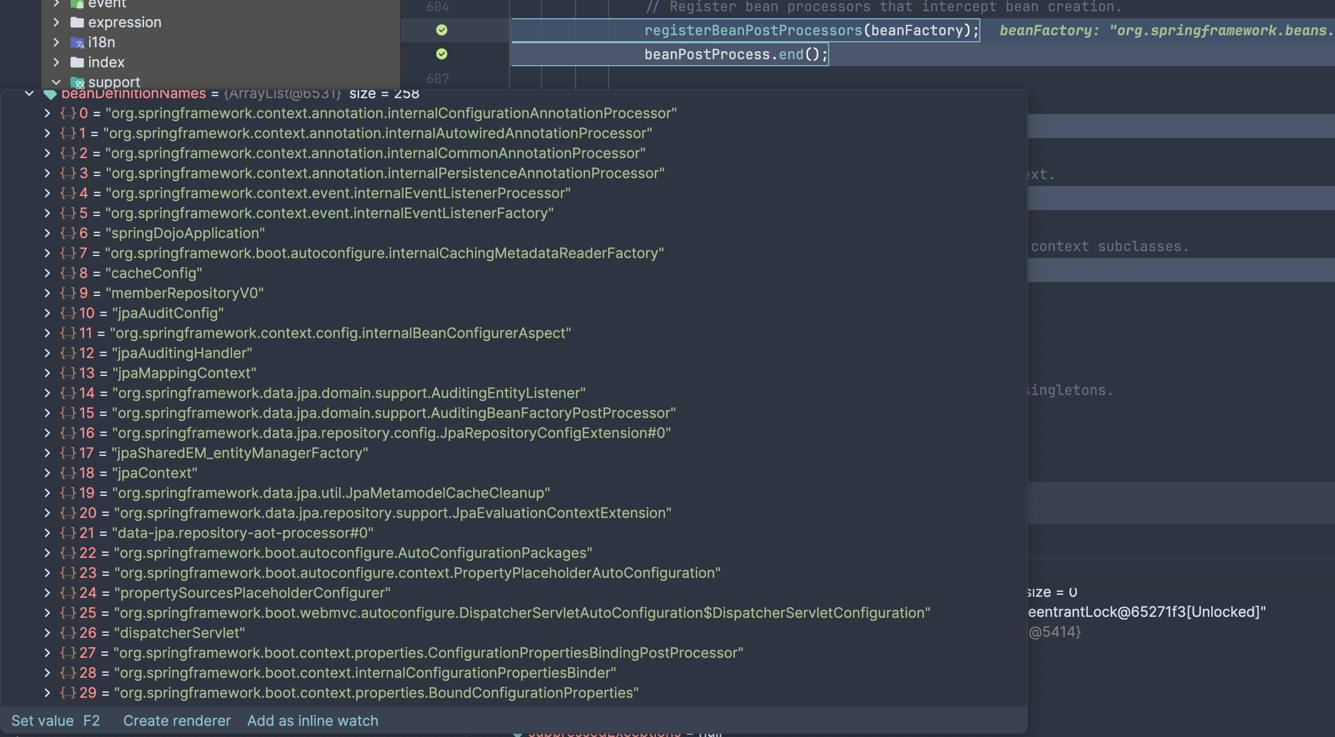
registerBeanPostProcessors(beanFactory)
registerBeanPostProcessors() 과정에서 설정에 따라 다르겠지만 모든 beanName이 등록되는것을 확인할 수 있다.
/**
 * bean 초기화 및 등록
 */
protected void registerBeanPostProcessors(ConfigurableListableBeanFactory beanFactory) {
    PostProcessorRegistrationDelegate.registerBeanPostProcessors(beanFactory, this);
}

final class PostProcessorRegistrationDelegate {
    public static void registerBeanPostProcessors(
            ConfigurableListableBeanFactory beanFactory, AbstractApplicationContext applicationContext) {

        String[] postProcessorNames = beanFactory.getBeanNamesForType(BeanPostProcessor.class, true, false);

        int beanProcessorTargetCount = beanFactory.getBeanPostProcessorCount() + 1 + postProcessorNames.length;
        beanFactory.addBeanPostProcessor(
                new BeanPostProcessorChecker(beanFactory, postProcessorNames, beanProcessorTargetCount));

        List<BeanPostProcessor> priorityOrderedPostProcessors = new ArrayList<>();
        List<BeanPostProcessor> internalPostProcessors = new ArrayList<>();
        List<String> orderedPostProcessorNames = new ArrayList<>();
        List<String> nonOrderedPostProcessorNames = new ArrayList<>();
        for (String ppName : postProcessorNames) {
            if (beanFactory.isTypeMatch(ppName, PriorityOrdered.class)) {
                BeanPostProcessor pp = beanFactory.getBean(ppName, BeanPostProcessor.class);
                priorityOrderedPostProcessors.add(pp);
                if (pp instanceof MergedBeanDefinitionPostProcessor) {
                    internalPostProcessors.add(pp);
                }
            } else if (beanFactory.isTypeMatch(ppName, Ordered.class)) {
                orderedPostProcessorNames.add(ppName);
            } else {
                nonOrderedPostProcessorNames.add(ppName);
            }
        }

        // PriorityOrdered bean 등록
        sortPostProcessors(priorityOrderedPostProcessors, beanFactory);
        registerBeanPostProcessors(beanFactory, priorityOrderedPostProcessors);

        // @Order에 따른 bean 등록
        List<BeanPostProcessor> orderedPostProcessors = new ArrayList<>(orderedPostProcessorNames.size());
        for (String ppName : orderedPostProcessorNames) {
            BeanPostProcessor pp = beanFactory.getBean(ppName, BeanPostProcessor.class);
            orderedPostProcessors.add(pp);
            if (pp instanceof MergedBeanDefinitionPostProcessor) {
                internalPostProcessors.add(pp);
            }
        }
        // beanFactory 우선순위에 맞게 다시 sorting
        sortPostProcessors(orderedPostProcessors, beanFactory);
        registerBeanPostProcessors(beanFactory, orderedPostProcessors);

        // 일반 Bean 등록
        List<BeanPostProcessor> nonOrderedPostProcessors = new ArrayList<>(nonOrderedPostProcessorNames.size());
        for (String ppName : nonOrderedPostProcessorNames) {
            BeanPostProcessor pp = beanFactory.getBean(ppName, BeanPostProcessor.class);
            nonOrderedPostProcessors.add(pp);
            if (pp instanceof MergedBeanDefinitionPostProcessor) {
                internalPostProcessors.add(pp);
            }
        }
        registerBeanPostProcessors(beanFactory, nonOrderedPostProcessors);

        // internal beanProcessor 재등록
        sortPostProcessors(internalPostProcessors, beanFactory);
        registerBeanPostProcessors(beanFactory, internalPostProcessors);

        beanFactory.addBeanPostProcessor(new ApplicationListenerDetector(applicationContext));
    }

    // 내부 메서드
    private static void registerBeanPostProcessors(
            ConfigurableListableBeanFactory beanFactory, List<? extends BeanPostProcessor> postProcessors) {

        if (beanFactory instanceof AbstractBeanFactory abstractBeanFactory) {
            abstractBeanFactory.addBeanPostProcessors(postProcessors);
        } else {
            for (BeanPostProcessor postProcessor : postProcessors) {
                beanFactory.addBeanPostProcessor(postProcessor);
            }
        }
    }
}
아래와 같이 registerBeanPostProcessors는 동작한다.
- PriorityOrdered 구현한 PostProcessor 먼저 등록
- Ordered 구현한 PostProcessor 등록
- 나머지 등록
- Internal PostProcessor 재등록
initApplicationEventMulticaster()
public abstract class AbstractApplicationContext extends DefaultResourceLoader
        implements ConfigurableApplicationContext {
    public static final String APPLICATION_EVENT_MULTICASTER_BEAN_NAME = "applicationEventMulticaster";

    // application event multicaster 초기화
    protected void initApplicationEventMulticaster() {
        ConfigurableListableBeanFactory beanFactory = getBeanFactory();
        if (beanFactory.containsLocalBean(APPLICATION_EVENT_MULTICASTER_BEAN_NAME)) {
            this.applicationEventMulticaster =
                    beanFactory.getBean(APPLICATION_EVENT_MULTICASTER_BEAN_NAME, ApplicationEventMulticaster.class);
            if (logger.isTraceEnabled()) {
                logger.trace("Using ApplicationEventMulticaster [" + this.applicationEventMulticaster + "]");
            }
        } else {
            this.applicationEventMulticaster = new SimpleApplicationEventMulticaster(beanFactory);
            beanFactory.registerSingleton(APPLICATION_EVENT_MULTICASTER_BEAN_NAME, this.applicationEventMulticaster);
            if (logger.isTraceEnabled()) {
                logger.trace("No '" + APPLICATION_EVENT_MULTICASTER_BEAN_NAME + "' bean, using " +
                        "[" + this.applicationEventMulticaster.getClass().getSimpleName() + "]");
            }
        }
    }
}
사용자가 별도로 등록한 bean이 존재하지 않다면, default로 SimpleApplicationEventMulticaster가 생성되는 것을 알 수 있다. 만약 event 비동기 처리가 필요하다면 직접 custom을 아래와 같이 진행해볼 수 있을거 같다.
public class SimpleApplicationEventMulticaster extends AbstractApplicationEventMulticaster {
    ...

    public void setTaskExecutor(@Nullable Executor taskExecutor) {
        this.taskExecutor = taskExecutor;
    }
}

@Bean
public ApplicationEventMulticaster applicationEventMulticaster() {
    SimpleApplicationEventMulticaster multicaster = new SimpleApplicationEventMulticaster();
    multicaster.setTaskExecutor(new AsyncTaskExecutor()); // 비동기 처리
    return multicaster;
}
onRefresh()
Template method which can be overridden to add context-specific refresh work. Called on initialization of special beans, before instantiation of singletons. This implementation is empty. throws BeansException in case of errors
템플릿 메서드로 실제로는 비어 있으며 자식 클래스(concrete)에서 이를 구현하여 처리할 수 있다.
protected void onRefresh() throws BeansException {
    // For subclasses: do nothing by default.
}
registerListeners()
protected void registerListeners() {
    // mutlicaster에 listener 등록
    for (ApplicationListener<?> listener : getApplicationListeners()) {
        getApplicationEventMulticaster().addApplicationListener(listener);
    }

    // 기본적으로 6개의 application listener bean name이 있다.
    // 실제 인스턴스화를 진행하는 것이 아니라 beanName만 등록한다.
    String[] listenerBeanNames = getBeanNamesForType(ApplicationListener.class, true, false);
    for (String listenerBeanName : listenerBeanNames) {
        getApplicationEventMulticaster().addApplicationListenerBean(listenerBeanName);
    }

    // 한번에 발행
    Set<ApplicationEvent> earlyEventsToProcess = this.earlyApplicationEvents;
    this.earlyApplicationEvents = null;
    if (!CollectionUtils.isEmpty(earlyEventsToProcess)) {
        for (ApplicationEvent earlyEvent : earlyEventsToProcess) {
            getApplicationEventMulticaster().multicastEvent(earlyEvent);
        }
    }
}
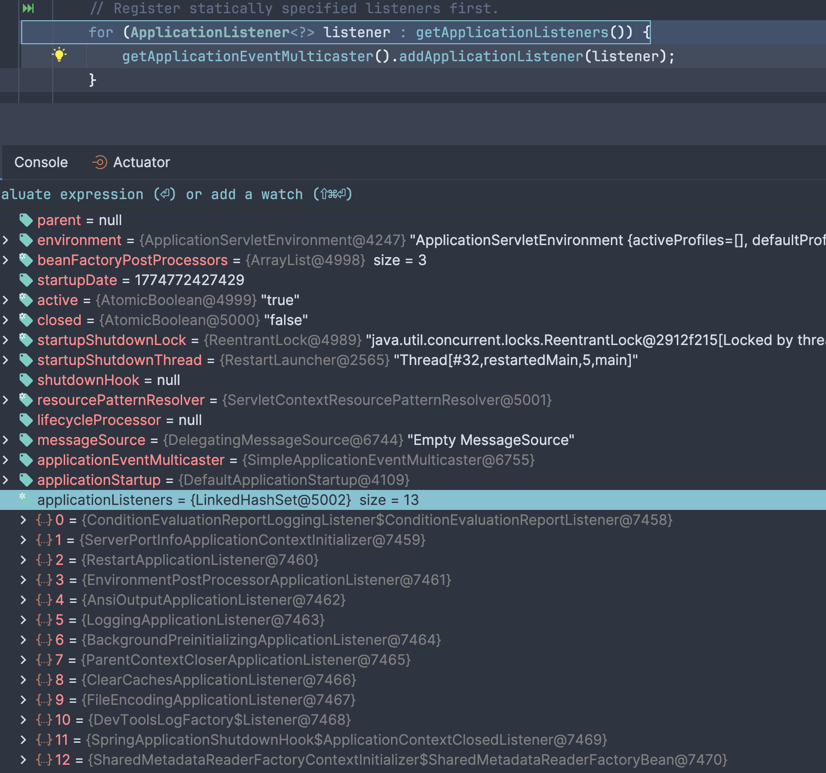
디버거에서 확인해보면 기본적으로 이미 인스턴스화된 12개의 listener를 등록하며 반복문을 순회하며 ApplicationListener를 Multicaster에 등록한다.
하단에 Bean Name을 추출하는 부분은 addApplicationListenerBean(listenerBeanName) 으로 동작하며 초기화를 해당 메서드 실행시에 진행하는 것이 아닌
실제 인스턴스화는 finishBeanFactoryInitialization()에서 이루어진다.
earlyApplicationEvents는 multicaster가 아직 준비되지 않은 시점에 발행된 이벤트들을 임시 보관하는 버퍼이다.
registerListeners()에서 multicaster가 준비된 시점에 한꺼번에 발행한다.
listenerBeanNames
- org.springframework.boot.autoconfigure.internalCachingMetadataReaderFactory
- applicationTaskExecutor
- mvcResourceUrlProvider
- springApplicationAdminRegistrar
- applicationAvailability
- restartingClassPathChangedEventListener
- conditionEvaluationDeltaLoggingListener
왜 이렇게 동작할까? addApplicationListener(listener)
prepareContext()에서 context.addApplicationListener(new KeepAlive()) 처럼 이미 new로 직접 생성된 인스턴스가 있으니까 바로 등록 가능하다.
addApplicationListenerBean(beanName)의 경우 @Component로 등록된 리스너처럼 아직 인스턴스가 없고 BeanDefinition만 존재한다. 따라서 이름만 예약해두고 finishBeanFactoryInitialization()에서 인스턴스화될 때 실제 등록이 가능하다.
finishBeanFactoryInitialization(beanFactory)
public abstract class AbstractApplicationContext extends DefaultResourceLoader
        implements ConfigurableApplicationContext {


    protected void finishBeanFactoryInitialization(ConfigurableListableBeanFactory beanFactory) {
        // Mark current thread for singleton instantiation with applied bootstrap locking.
        beanFactory.prepareSingletonBootstrap();

        // Initialize bootstrap executor for this context.
        if (beanFactory.containsBean(BOOTSTRAP_EXECUTOR_BEAN_NAME) &&
                beanFactory.isTypeMatch(BOOTSTRAP_EXECUTOR_BEAN_NAME, Executor.class)) {
            beanFactory.setBootstrapExecutor(
                    beanFactory.getBean(BOOTSTRAP_EXECUTOR_BEAN_NAME, Executor.class));
        }

        // Initialize conversion service for this context.
        if (beanFactory.containsBean(CONVERSION_SERVICE_BEAN_NAME) &&
                beanFactory.isTypeMatch(CONVERSION_SERVICE_BEAN_NAME, ConversionService.class)) {
            beanFactory.setConversionService(
                    beanFactory.getBean(CONVERSION_SERVICE_BEAN_NAME, ConversionService.class));
        }

        // Register a default embedded value resolver if no BeanFactoryPostProcessor
        // (such as a PropertySourcesPlaceholderConfigurer bean) registered any before:
        // at this point, primarily for resolution in annotation attribute values.
        if (!beanFactory.hasEmbeddedValueResolver()) {
            beanFactory.addEmbeddedValueResolver(strVal -> getEnvironment().resolvePlaceholders(strVal));
        }

        // Call BeanFactoryInitializer beans early to allow for initializing specific other beans early.
        String[] initializerNames = beanFactory.getBeanNamesForType(BeanFactoryInitializer.class, false, false);
        for (String initializerName : initializerNames) {
            beanFactory.getBean(initializerName, BeanFactoryInitializer.class).initialize(beanFactory);
        }

        // Initialize LoadTimeWeaverAware beans early to allow for registering their transformers early.
        String[] weaverAwareNames = beanFactory.getBeanNamesForType(LoadTimeWeaverAware.class, false, false);
        for (String weaverAwareName : weaverAwareNames) {
            try {
                beanFactory.getBean(weaverAwareName, LoadTimeWeaverAware.class);
            } catch (BeanNotOfRequiredTypeException ex) {
                if (logger.isDebugEnabled()) {
                    logger.debug("Failed to initialize LoadTimeWeaverAware bean '" + weaverAwareName +
                            "' due to unexpected type mismatch: " + ex.getMessage());
                }
            }
        }

        // Stop using the temporary ClassLoader for type matching.
        beanFactory.setTempClassLoader(null);

        // Allow for caching all bean definition metadata, not expecting further changes.
        beanFactory.freezeConfiguration();

        // Instantiate all remaining (non-lazy-init) singletons.
        beanFactory.preInstantiateSingletons();
    }
}
(작성중..)